I’m not sure if I’ve ever mentioned this before, but my dress form’s name is Felicity. I named her that to remind me to be patient because in the American Girl books I read growing up Felicity’s mother was constantly telling her “Patience, Felicity.” As I am not a very patient person, my mother ended up telling me “Patience, Felicity” a lot growing up. Since sewing requires a lot of patience the name seemed like a good fit.
Felicity had gone through several iterations in the time I’ve had her. She started out as an adjustable dress form, and technically still is underneath.
I liked Felicity but even adjustable dress forms only adjust so much and I wanted something that was more exact to my measurements so I ended up making a duct tape dress form that I put overtop of Felicity and stuffed. If you’re not familiar with this method it’s where you put on a large shirt or dress and then wrap yourself with duct tape and cut the shirt off of you in order to make an exact mold of your body.
Here is Felicity in duct tape form in my car coming home from school.
While this made her the same size as me, I quickly learned that it was a pain to pin things to because my pins would be ruined by the duct tape. They got all sticky which wasn’t ideal.
So now I found a padding system for dress forms that I am excited about! The kit comes with a bunch of foam pieces that you use the pad out your dress form under a dress form cover to make whatever body shape you want.
Working on inserting the padding. You can see the remains of the duct tape version on the floor behind it.All padded and ready to go!Testing the measurements with one of my shirts.
I’m really happy with it so far because it looks nicer than the duct tape and I can pin into the dress form anywhere without having to worry about hitting a gap from the adjustments or getting pins sticky!
Felicity is new, improved, and ready to go! I guess I’d better sew something new then!
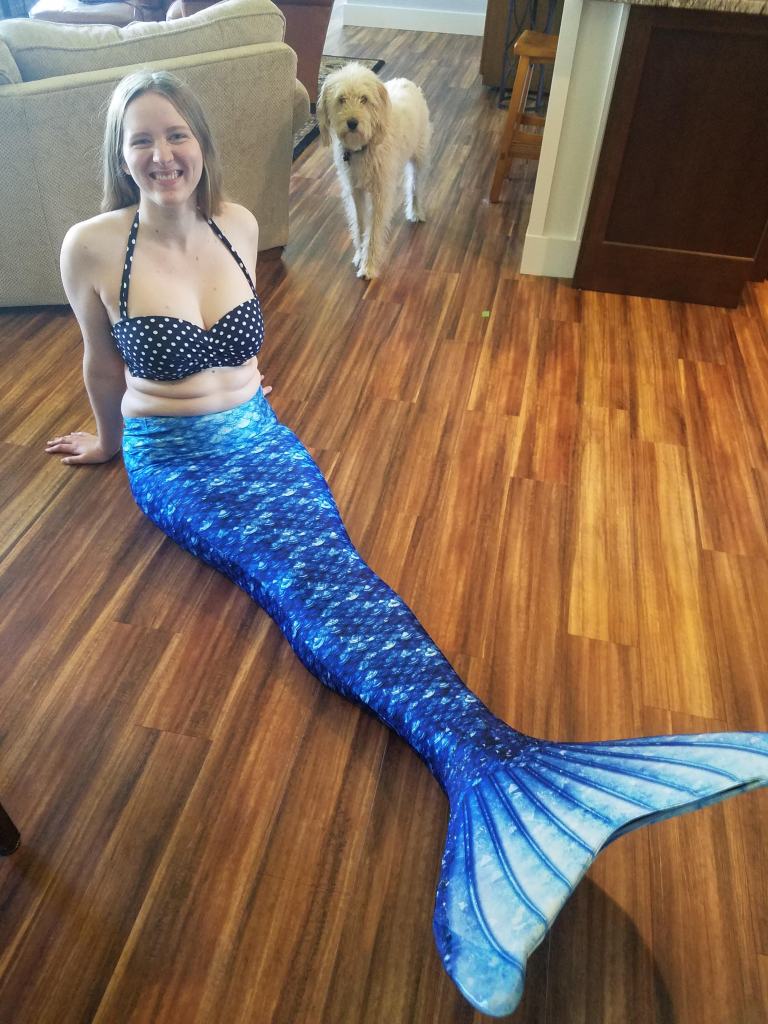
This isn’t historical but I gave myself a little quarantine gift of a mermaid tail just for fun. I’m lucky enough to live on a lake so I figured now was as good of a time as any to finally fulfill my five-old-dreams and be a mermaid!
Historical clothing is fun but to really look like you stepped out of a portrait you need to think about your outfit from head to toe. In the 18th century people used pomatum (essentially old time-y pomade) and powder to both style their hair and keep it clean. The American Duchess Guide to Beauty has a ton of great research on this and I highly recommend it. To achieve my own historical hair dreams, I decided to finally use their recipe to make my own pomatum.
I gathered my ingredients and got ready to go. The two main ingredients are lard and tallow which sounds gross to most people, however it’s not like putting bacon grease on your head as both the lard and tallow are thoroughly washed. The reason animal products are used is because it works with human body chemistry (since we’re animals). This is explained really well in the American Duchess book so I’ll refer you there again if you want to know more (this isn’t sponsored it just really is a great resource).
It was a little intimidating to be working with such weird ingredients (or at least weird to me) but it actually ended up being fairly simple and I soon had a bunch of little jars of pomatum ready to use. The recipe made a lot so I think I’m set for many years to come.
The best part about the pomatum is that it is a natural bug repellent because it has lavender and clove oil in it! I actually use it on my skin as a normal bug repellent because I think it works just as well or better than the modern spray on stuff, it smells much better, and it doesn’t leave me feeling greasy.
The pomatum makes it much easier to do historical hairstyles because it, combined with hair powder makes your hair really sculptable. My mom kindly let me put it in her hair as well as mine so I could practice historical hair on her.
It was a fun project and a great way to learn even more about 18th century women.
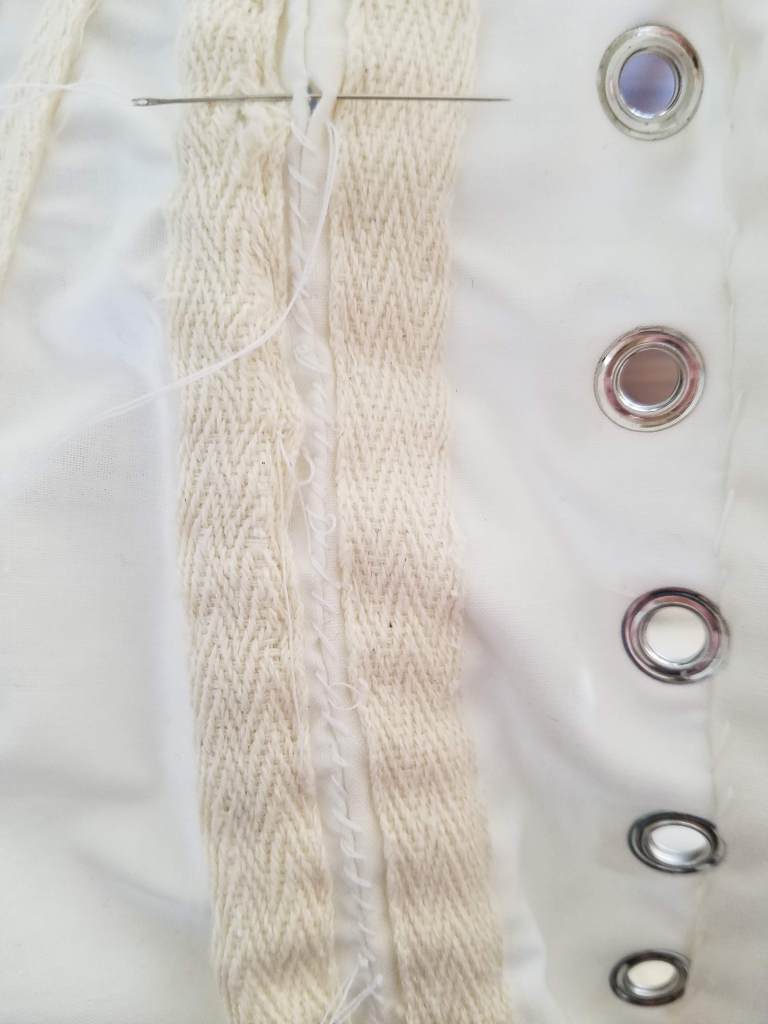
With my undergarments complete I was almost ready to wear my real antique dress! Before I could I added two small strips of insertion lace to the back of the gown where I could sew new buttons on to make the dress just a little bigger. While I could technically get the dress buttoned with it’s original buttons the addition of new undergarments made the fit a little too snug and I didn’t want to put stress of something that is over 100 years old. I made sure to very carefully baste the added piece on so it is easily removable so the dress can be returned to its original state. This way I can give the dress a new life by actually wearing it, but I can also preserve the history of the garment.
The dress was probably made sometime between 1900 and 1910, though I don’t know an exact date. I wish I could know the story behind this dress like who made it and where it’s been but there’s no way to tell. I am happy to give it a new life here in 2020 though!
In this photo you can just see the slight color difference between the original gown and the panel I added at the back.
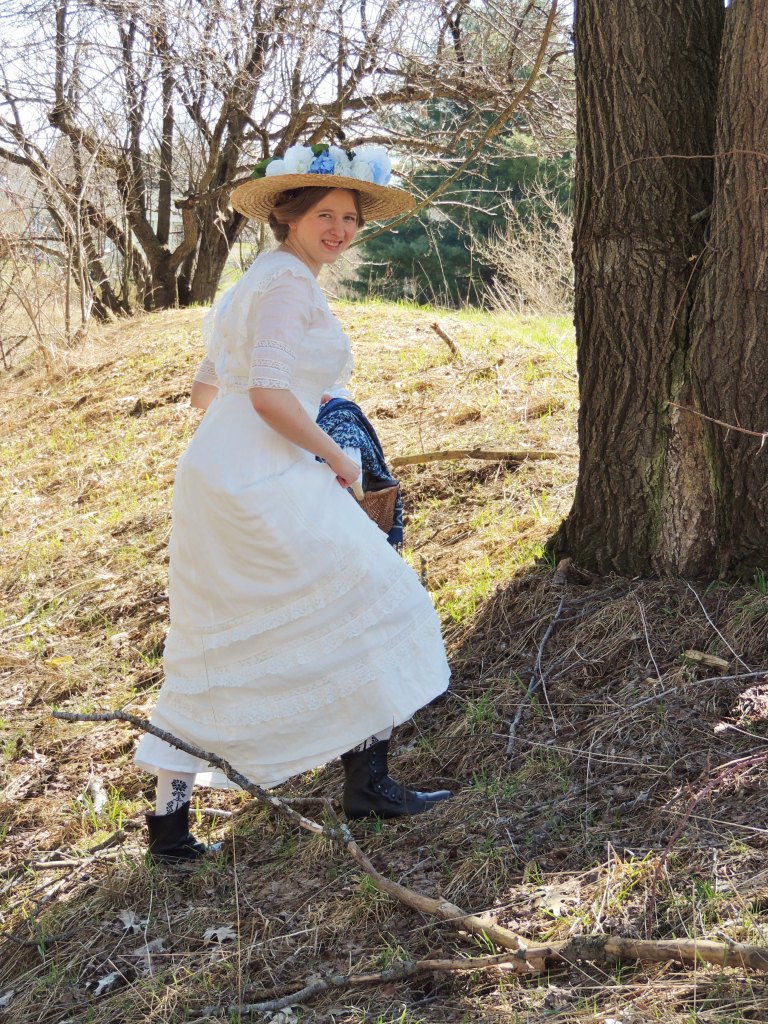
My hat ended up a happy accident that I absolutely love! The base is a cheap straw hat from a craft store that I’ve had for years. I meant to cut it up for another project years ago but I never got around to it and now I’m glad that I didn’t! The flowers are the giant flower crown that I made for a renaissance fair last year and it fit perfectly over the hat. I originally put it there just for storage but I liked the way it looked and it was perfect for Edwardian so I kept it on there!
The dress is light and comfortable for the summer and feels perfect for any sort of Edwardian picnicking or adventuring!
My dog, Whitacre, agreed that picnicking was a good idea! The dress also goes wonderfully with my great-grandmother’s stereoscope. A Stereoscope allows the viewer to see three-dimensional pictures of far away places and was a fun pass time for Victorians and Edwardians when it was invented in the 1830s. The stereoscope is especially appropriate as I made and wore this at the beginning of quarantine so it gave me a fun way to see places from the safety of my own home!
Me using the stereoscope. It still works great!
I’m so glad to have been able to give this dress a new life and to have a little piece of history right in my own home. Now all I need is a suffragette sash to go with it!
There was a big sale on linen back in March or April so I went to the fabric store and quite literally bought it by the bolt. 100% linen is a more expensive fabric, especially compared to my normal recycled bed sheets, but it is the king of all fabrics in my opinion. Not only is it actually historically accurate, it also is a natural fiber which means it is breathable and cool in the summer months. The more wash linen, the softer it gets so it makes great shifts and petticoats, and it’s also incredibly strong and durable so it will last a lot more wears than other fabrics. Like I said, king of the fabrics.
Part of costuming on a budget sometimes means I use less desirable materials because they are cheaper, but another great way to keep in budget is just to wait for sales or use coupons. This isn’t a groundbreaking tip, but it really makes a difference.
So with my yards and yards of newfound sale linen, I got to work. First, I made myself two new shifts and an 18th century petticoat because these are things I needed made out of linen the most. My previous shift and petticoat were made of a poly/cotton blend which meant that they were really hot to wear in the summer. I still kept them, despite their polyester-ness, because they still work on days that aren’t as hot and it is always nice to have extra!
I made the shifts without sleeves, which is not accurate for the 18th century. I decided not to go for accuracy though so that I could use the extra fabric for other projects and also so I could make an “era-neutral” shift. Shifts or chemises are used in all historical eras and while they did change slightly overtime the basic idea stayed the same so I wanted something that I could easily use with any of my historical costumes. 18th century shifts have sleeves, but Victorian ones don’t, so I just left the sleeves off. Since the shift is the bottom layer of clothing no one sees it so I don’t mind this glaring inaccuracy for some eras.
From there I started making Edwardian undergarments to go with the corset I had just made. For the Edwardian era I needed a corset cover and a petticoat. A corset cover is basically a top which goes over the corset to help smooth out the hard edges of it so you don’t see them through the gown and an Edwardian petticoat is shaped very differently from the 18th century petticoats I have so I couldn’t reuse what I already had.
For the corset cover, I went for what is historically known as a handkerchief corset cover. It was called this because women could quite literally use large handkerchiefs to make some of these. Basically you cut the fabric (or handkerchiefs) into large triangles and connect those with some pretty insertion lace to make a kind of tank top shape.
Cutting the trianglesAdding insertion lace
I then put some hooks and eyes on the front for closures and it was done! It’s a simple corset cover but it does the job and I am very happy with how it turned out.
The front…back….and side of the corset cover. These show off the lace nicely.
Sadly, I didn’t take any photos of the process of making the petticoat, mostly because I was just winging it. I didn’t have a pattern and decided that it looked simple enough so I just kind of went for. I didn’t right anything down so I don’t know if I could ever remake it but I remember I basically cut some very large and skinny triangles so make a kind of skirt shape. It was a very inexact science but it worked and I am happy with the result.
Now happily clad in my linen I was was almost ready to finally wear my antique dress and see what it would have looked like on someone more than 100 years ago. The big reveal coming soon!
That Edwardian corset I started once upon a time did end up getting finished, though it did give me a few challenges that I hadn’t expected.
The issues were mostly fit related and also had to do with the fact that I was using cheaper materials (this is history on a budget after all). From the front everything looked great!
From the side things didn’t look too bad either, though there is some puckering. I was getting a nice pushed forward posture which is exactly what the corset was supposed to be doing for this era.
The back, however, was a bit of a mess.
The grommets were ripping out of the fabric, the seams looked about ready to rip as well, and the lacing bowed out in the middle instead of making two straight lines. The worst part was I didn’t even have to corset laced very tightly.
I fixed the back pieces so it would fit better and added some iron on patch pieces under the new grommets to give them something more to hang onto (that isn’t historically accurate but seeing as the corset is made of old bed sheets in the first place I wasn’t too concerned). I then went in and reinforced some of the seams by adding a quick hand done whip stitch on the inside for extra strength.
With that it finally fit right and I was able to bind the edges and add some lace for decoration!
I then had a new problem to face. The corset fit how I wanted and looked nice but I used metal boning in it and forgot to put caps on the ends of the bones so the sharp metal was wearing through the fabric. Luckily, there is a historical solution for this called flossing!
Flossing is wear you embroider over the area where the end of the bones are, often in a decorative way, which looks nice but also helps reinforce the area where the end of the bones are so they don’t poke through and end up stabbing you. I went for a simple flossing design, but they can also be quite elaborate. I did mine in blue just to add a little fun!
With that, the corset was truly finished and I was ready to move on to the next layers of an Edwardian ensemble.
The finished corsetYou can see that the back now fits much better and the lacing is straight up and down.
As per usual I am way behind on posts, but that just means you have lots of content to look forward to! Life got hectic as I moved out of school and finished out the semester online in quarantine and have since been lucky enough to find a job. I currently work at a place where I manufacturing hospital gowns for the pandemic so I’ve been able to use my skills to help out and I feel rather like Rosie the Riveter in the process!
We can do it!
On that note, please continue to wear your masks and social distance! I know it’s not fun but we need to continue being careful so we can keep ourselves and others safe. For now, that’s the best thing we can do to bring us closer to being all together again.
I have a bunch more posts coming soon as I catch you all up on the sewing I’ve been doing in quarantine and I can’t wait for you see them! Keep an eye out for them.
As a challenge to myself and a way to educate others I decided to wear corsets for a week straight. If you follow my Instagram you will have already seen a lot about this back in when I did it, but I wanted to go more into depth here.
I wanted to show that corsets are not painful torture devices and that I could still go about my day to day life with no problems. My rules were that I needed to wear a corset every day, I had to wear the corset on the outside of my clothing a few times, and I wasn’t going to wear my corsets for exercising (only because I didn’t really want to have to get them sweaty figure out how to get them clean, movement and breathing are not an issue). With that, my week started.
The first day I decided to keep things more low key. The corset was hidden and really not noticeable to anyone. I knew it was there, my posture was great, and I was comfortable. I’ve actually worn this outfit with a corset before so it really wasn’t a big deal. I was telling someone about my challenge and how it was part of being proud of and really embracing my hobby and they told me the best pun. It’s my hobby embracing me! I thought it was really funny as I love puns. The day went by pretty uneventfully.
Day two was a little harder. I decided to put the corset where it could be seen but I wore a big sweater that I could hold closed in case I felt uncomfortable. Once again, movement wise I was fine. My corsets are incredibly comfortable because they are made to fit me and because corsets are supposed to be comfortable. People lived, worked, and did everything on corsets in the past, if they weren’t comfortable and practical, they wouldn’t have been used. A corset’s purpose is not to reduce your waist, it is to provide support much like a modern bra except that the support is extended to your abs and back as well.
The real challenge of this for me was feeling self-conscious. Wearing something that is against the norm feels really difficult and it feels like everyone is looking at you. I love my corsets, but I know to the world they have sexualized and that it just isn’t normal. I was scared people wouldn’t understand or they would judge me. I for sure got some weird or confused looks, I think a guy starred at my boobs at one point, but for the most part people actually thought it was really cool. Despite some people’s interest it was still scary but I had committed to the week and was posting about it on my Instagram so I had to keep going and follow through with my commitment.
Day three was probably my favorite outfit of the week. It was cute, it blended in but also showed off the corset and I got to wear a skirt with pockets which is always good. I was still a little afraid to show the corset off so publicly but I also felt really cute in this outfit.
Day four I hid the corset again just for a new variation and because I was a little tired of being on display. It was also really cold that day and I just wanted to be snugly and warm in my sweater. I was still very comfortable.
Day five I was really feeling over this whole challenge. I was tired of feeling like an anomaly, and to get really personal, I started my period and didn’t want to feel squeezed. I was afraid I would be unhappy and uncomfortable all day long but I couldn’t give up after doing four days of the challenge already. I chose my most comfortable corset and paired it with a sweater so I could cover the corset if I really started feel uncomfortable with everything. I figured women wore these for hundreds of years and were fine. If they could do it, I could too. It was actually really comfortable and I was glad to be wearing it. Because corsets are super adjustable I laced myself a little looser and went about my day. The corset supported me even when I was tired and didn’t want to support myself and it was like getting a comforting hug all day. It was a big turning point for me in the week.
Day six I was really busy. I had about a million things to do along with rehearsals so I wore athletic wear, but with a corset on top. At this point I really didn’t care about wearing the corset anymore. It felt so normal that I forget to wonder what people thought. The only downside was my busy day involved some intense movement rehearsals so I had to keep changing from corset back to sports bra which was a little annoying. When I was wearing my sports bra, I actually kind of missed wearing corset!
Day seven was another busy day and I had work to do helping with the set so I wore work clothes, paired of course, with a corset. I decided since it was my last day to go out with a bang and wear my corset completely uncovered for the world to see. I was comfortable and found the back support nice while doing building work. It was a fun contrast to be working the chop saw and building things while wearing a lacy corset. I quite liked the odd picture it made. I also didn’t feel self-conscious anymore which was really amazing.
As the grand finale to the week I changed corsets on the last day and put on my regency outfit for a historical event I had that evening. I managed to get two of my friends to go with me so it was fun to dress them up and take them out!
Overall, the week was an amazing experience. It really stretched me and helped me educate people about corsets and the people of the past. Part of wearing these historical clothes is demystifying the people of the past. If we can see historical people as human we are more likely to relate to them and learn from them so we can learn from their lives. History is important and clothing is a great bridge to connecting us to them.
One the eighth day of this, I returned to my normal life. I wore my normal 21st century bras and I actually missed the corsets. I had gotten used to wearing them throughout the week. I want to start wearing them in day to day life more often because they really are something I love. Practically they aren’t something I will wear daily because my life is really active and all over the place but every now and then, why not throw one on? I find them more comfortable and they’re a great way to share my passion. I’ll admit since doing this challenge I haven’t really worn any more corsets but I still found the experience to be really important and wonderful.
Go do something to push yourself, it can be really rewarding.
What first started my want to make something Edwardian was trying on a fellow costumer’s beautiful Edwardian S-Bend corset. I wanted one of my own but they are way too expensive for me to buy and I was intimidated by the thought of making one. The project was in the back of my mind and them I found that Edwardian dress so it brought me back to wanting Edwardian and I decided to try and make the S-Bend corset I want. I got a pattern from Truly Victorian and got started.
I have made a bunch of 18th century corsets now but I’m not as familiar with Victorian ones and have never attempted one like this. I think overall it’s going well but we will find out when it is finished. Wish me luck!
So since I’m still playing catch up on my posts this post is from New Years and I’m only now getting out and it’s March… whoops. So ignore the Christmas decorations or enjoy a little bit of Christmas in March, your choice.
Seeing as I we were jumping into a new decade I decided that it was the perfect time to make a fun 1920s dress to celebrate! This was a quick one day project just for fun. The fabrics are modern and I drafted the pattern based on some photos I’ve seen of 1920s dress patterns before. It was just something quick and fun for myself!
As you can see from my photos I was incredibly professional throughout this process. Top notch sewing on display.
These- unorthodox techniques actually worked pretty well. I used old bed sheets, as usual, for the slip layer and then found some fun art deco fabric at Joanne Fabrics for the outer layer.
I am really happy with how this dress turned out and I felt wonderfully dressed for to ring in the New Year. It was like I walked out of an episode of Downton Abbey.
One last silly photo of my feeling dramatic for fun!
The dress is super fun and now I have a nice vintage evening look in my collection.
I hope you are enjoying your 2020s and having lots of good vintage fun!